Tạo ứng dụng Todo với Redux có tương tác API trong Reactnative - P2
Tiếp theo bài này, bạn cần thực hiện thành công ví dụ mẫu ở phần 1: https://zezo.dev/view/tao-ung-dung-todo-voi-redux-co-tuong-tac-api-trong-reactnative-p1
Ở phần 1 đã hiển thị được danh sách rồi, sang phần này sẽ làm chức năng xóa.
Bước 1: Chỉnh sửa Reducer thêm thao tác xử lý xóa
Bên trong hàm builder của extraReducers, bạn thêm đoạn code xử lý kết quả xóa
		// sau khi gọi api ở action xong trong này mới hoạt động
        builder.addCase(deleteTodoApi.fulfilled, (state, action) => {
            // Xóa todo
             state.listTodo = state.listTodo.filter(row => row.id !== action.payload);

        }) .addCase(deleteTodoApi.rejected, (state, action) => {
            // Xử lý khi yêu cầu xóa todo bị từ chối hoặc xảy ra lỗi
            console.log('Delete todo rejected:', action.error.message);
        });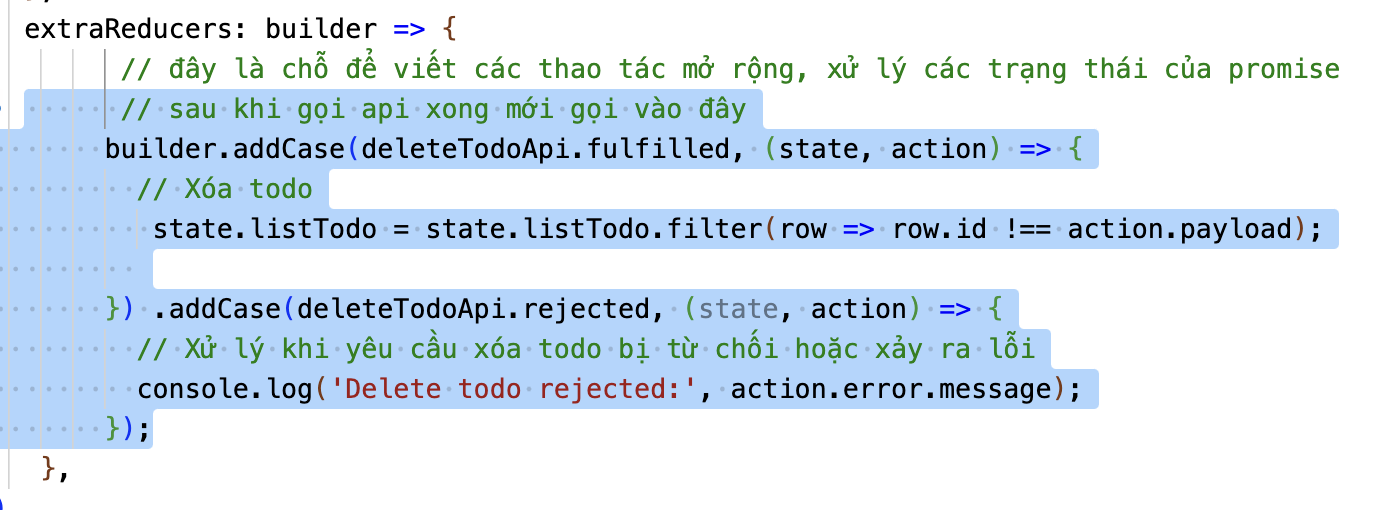
Code trên có phần deleteTodoApi.fulfilled: Hàm deleteTodoApi ở trong file todoAction sẽ thực hiện gọi API, sau khi gọi API sẽ trả về một Promise (xem thêm tại đây https://developer.mozilla.org/en-US/docs/Web/JavaScript/Reference/Global_Objects/Promise). Promise sẽ trả về trạng thái fulfilled hoặc rejected. Nếu fulfilled thì là việc tương tác API thành công, nếu rejected thì là lỗi quá trình tương tác API hoặc server từ chối thao tác xóa.
Bước 2: Tạo hàm deleteTodoApi cho todoAction.js
Bạn vào file todoAction.js thêm hàm deleteTodoApi như dưới đây. Chuỗi 'todo/deleteTodoApi' là định danh xác định tên action.
export const deleteTodoApi = createAsyncThunk(
    'todo/deleteTodoApi',
    async (id, thunkAPI) => {
      try {
        // Gửi yêu cầu DELETE đến API để xóa todo
        const response = await fetch(`${api_url}/${id}`, {
          method: 'DELETE',
        });
        // console.log(response);
        if (response.ok) {
            // console.log(response);
          // Sau khi xóa thành công, trả về id của todo đã xóa để cập nhật store
          // action.payload ở trong reducer sẽ chính là id
           return id;
        } else {
          // Nếu có lỗi từ phía server, trả về lỗi cho reducer
          const errorData = await response.json();
          return thunkAPI.rejectWithValue(errorData);
        }
      } catch (error) {
        // Xử lý lỗi nếu có bất kỳ lỗi nào xảy ra
        return thunkAPI.rejectWithValue(error.message);
      }
    }
  );
Bước 3: Chỉnh sửa todoScreen.js để hiển thị chức năng xóa
Trước lệnh return của component TodoScreen, bạn thêm hàm xử lý xóa như sau:
    // hàm xử lý xóa
    const handleDeleteTodo =async (id)=>{
        dispatch(deleteTodoApi(id))
            .then((result) => {
                console.log('Todo deleted successfully!');
            })
            .catch((error) => {
                console.error('Error deleting todo:', error);
            });
    }
Trong phần return view ở vòng lặp in danh sách các phần tử, bạn thêm nút bấm xóa cho dòng dữ liệu
<TouchableOpacity onPress={()=>handleDeleteTodo(row.id)} >
      <Text style={{color: 'red'}}>Xóa</Text>
</TouchableOpacity>
Chú ý thêm cả phần import cho TouchableOpacity để tránh lỗi
import {  Text, View ,TouchableOpacity} from "react-native";
import { fetchTodos, deleteTodoApi} from '../redux/actions/todoAction';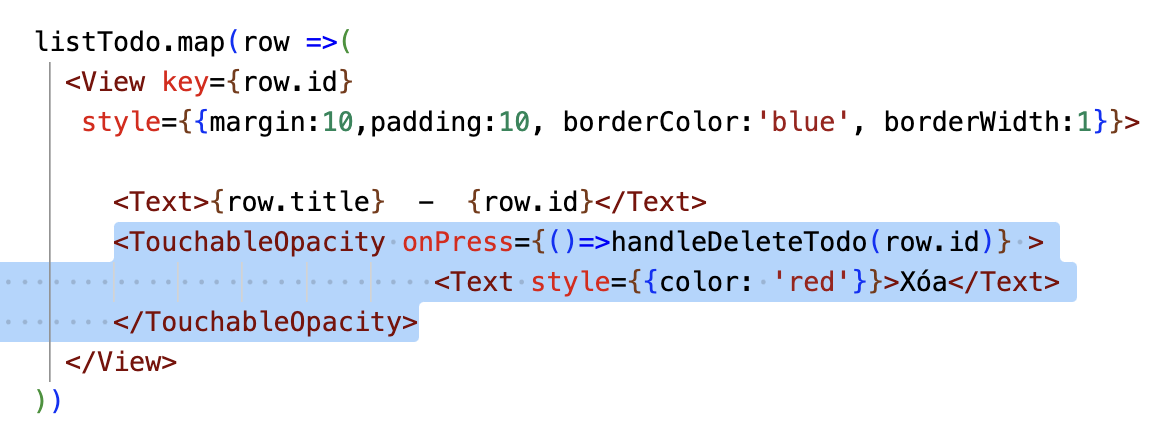
Nguồn: zezo.dev