Tiếp theo bài này, ít nhất bạn cần thực hiện thành công ví dụ mẫu ở phần 1: https://zezo.dev/view/tao-ung-dung-todo-voi-redux-co-tuong-tac-api-trong-reactnative-p1
Trong phần này sẽ thực hiện xây dựng chức năng Đổi trạng thái
Bước 1: Chỉnh sửa Reducer thêm thao tác xử lý Đổi trạng thái
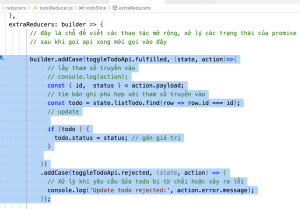
Bên trong hàm builder của extraReducers, bạn thêm đoạn code xử lý kết Thêm toggleTodoApi.fulfilled
         builder.addCase(toggleTodoApi.fulfilled, (state, action)=>{
              // lấy tham số truyền vào
              // console.log(action);
              const { id,  status } = action.payload;
              // tìm bản ghi phù hợp với tham số truyền vào
              const todo = state.listTodo.find(row => row.id === id);
              // update

              if (todo ) {
                todo.status = status; // gán giá trị
              }

            })
            .addCase(toggleTodoApi.rejected, (state, action) => {
              // Xử lý khi yêu cầu Sửa todo bị từ chối hoặc xảy ra lỗi
              console.log('Update todo rejected:', action.error.message);
            });
Bước 2: Tạo hàm toggleTodoApi cho todoAction.js
Bạn vào file todoAction.js thêm hàm toggleTodoApi như dưới đây. Chuỗi ‘todo/toggleTodoApi’ là định danh xác định tên action.
export const toggleTodoApi = createAsyncThunk(
    'todo/toggleTodoApi',
    async (objUpdate, thunkAPI) => {
      // console.log('objupdate: '+ JSON.stringify(objUpdate));
       try {
        // Gửi yêu cầu update đến API
        const response = await fetch(`${api_url}/${objUpdate.id}`, {
          method: 'PUT',
          headers: {
            'Accept': 'application/json',
            'Content-Type': 'application/json'
          },
          body: JSON.stringify(objUpdate.data)
        });

        const data = await response.json();
        // console.log(response);
        // Kiểm tra nếu status code là 200 hoặc 204 thì xóa thành công
        if (response.ok) {
            // console.log(response);
          // Sau khi xóa thành công, trả về id của todo đã xóa để cập nhật store
           return data;
        } else {
          // Nếu có lỗi từ phía server, trả về lỗi
          const errorData = await response.json();
          return thunkAPI.rejectWithValue(errorData);
        }
      } catch (error) {
        // Xử lý lỗi nếu có bất kỳ lỗi nào xảy ra
        return thunkAPI.rejectWithValue(error.message);
      }
    }
  );
Bước 3: Chỉnh sửa todoScreen.js để hiển thị chức năng Đổi trạng thái
Trước lệnh return của component TodoScreen, bạn thêm hàm xử lý SỬA như sau:
 const handleToggleTodo = (id,status) => {
        // dispatch(toggleTodoStatus(id));
        console.log('status: ' + status);
        let duLieuUpdate = {status: !status};
        console.log(duLieuUpdate);
        dispatch(toggleTodoApi({id: id, data:duLieuUpdate}))
        .then((result) => {
            // console.log(JSON.stringify(result));
            console.log('Todo update status successfully!');

        })
        .catch((error) => {
            console.error('Error update todo:', error);
        });
    };
Không quên import toggleTodoApi
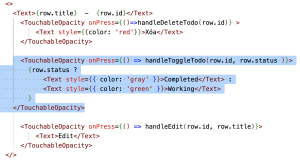
import { fetchTodos, deleteTodoApi, addTodoAPI, updateTodoApi,toggleTodoApi } from '../redux/actions/todoAction';Trong phần return bạn cần thêm vào chỗ hiển thị dòng dữ liệu một nút bấm
 <TouchableOpacity onPress={() => handleToggleTodo(row.id, row.status )}>
       {row.status ?
           <Text style={{ color: 'gray' }}>Completed</Text> :
           <Text style={{ color: 'green' }}>Working</Text>
       }
 </TouchableOpacity>
Chạy lại ứng dụng để thử nghiệm kết quả.