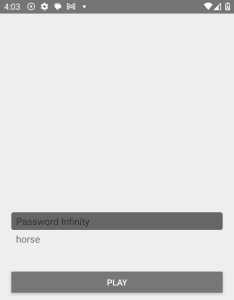
Trước khi thao tác theo bài viết này, bạn cần có ứng dụng đơn giản theo hướng dẫn ở bài viết trước https://zezo.dev/view/huong-dan-lam-ung-dung-choi-nhac-co-cac-chuc-nang-dieu-khien-trong-reactnative
Bài viết này sẽ cải tiến ứng dụng để quản lý Playlist.
TrackPlayer cung cấp một số hàm điều khiển chơi nhạc:
TrackPlayer.remove: Xóa một bản nhạc ra khỏi danh sách theo số thứ tự (đối với các bản nhạc đã được add bởi hàm addTracks()
TrackPlayer.skip: Chuyển tới một bản nhạc được chỉ định bởi số thứ tự
TrackPlayer.next: Chuyển sang bản nhạc tiếp theo
TrackPlayer.previous: Chuyển về bản nhạc trước đó
TrackPlayer.reset: Xóa danh sách nhạc và dừng phát nhạc
Bước 1: Bổ sung thêm import component trong file App.tsx
Chú ý: Bạn cần so sánh sự khác biệt code này với code ở bài trước để biết sẽ thêm component nào
import {
  SafeAreaView,
  StyleSheet,
  Text,
  View,
  Button,
  FlatList,
  ActivityIndicator,
  TouchableOpacity,
} from 'react-native';
import TrackPlayer, {
  useTrackPlayerEvents,
  Event,
  State
} from 'react-native-track-player';
Bước 2: Tạo một component PlayList để hiển thị danh sách bài nhạc
có thể viết trực tiếp trong file app hoặc tách riêng
function Playlist() {
  const [queue, setQueue] = useState([]);
  const [currentTrack, setCurrentTrack] = useState(0);

  async function loadPlaylist() {
    const queue = await TrackPlayer.getQueue();
    setQueue(queue);
  }

  useEffect(() => {
    loadPlaylist();
  }, []);

  useTrackPlayerEvents([Event.PlaybackTrackChanged], async (event) => {
    if(event.state == State.nextTrack) {
      let index = await TrackPlayer.getCurrentTrack();
      setCurrentTrack(index);
    }
  });

  function PlaylistItem({index, title, isCurrent}) {

    function handleItemPress() {
      TrackPlayer.skip(index);
    }

    return (
      <TouchableOpacity onPress={handleItemPress}>
        <Text
          style={{...styles.playlistItem,
            ...{backgroundColor: isCurrent ? '#666' : 'transparent'}}}>
        {title}
        </Text>
      </TouchableOpacity>
    );
  }

  return(
    <View>
      <View style={styles.playlist}>
        <FlatList
          data={queue}
          renderItem={({item, index}) => <PlaylistItem
                                            index={index}
                                            title={item.title}
                                            isCurrent={currentTrack == index }/>
          }
        />
      </View>
    </View>
  );
}
Bước 3: Thêm thẻ <PlayList> vào component chính
 return (
    <SafeAreaView style={styles.container}>
      <Playlist />
      <Button title="Play" color="#777" onPress={() => TrackPlayer.play()}/>
    </SafeAreaView>
  );
Bước 4: Thêm Style
const styles = StyleSheet.create({
  container: {
    flex: 1,
    justifyContent: 'center',
    padding: 20,
    backgroundColor: '#eee' // chú ý màu tương phản giữa chữ và nền để nhìn được các phần tử
  },
  playlist: {
    marginTop: 40,
    marginBottom: 40
  },
  playlistItem: {
    fontSize: 16,
    paddingTop: 4,
    paddingBottom: 4,
    paddingLeft: 8,
    paddingRight: 8,
    borderRadius: 4
  },
});
Bước 5: Sửa lại hàm addTracks() để thêm bản nhạc
export async function addTracks() {
  await TrackPlayer.add([
    {
      id: '1',
      url: 'https://cdn.pixabay.com/audio/2022/10/18/audio_31c2730e64.mp3',
      title: 'Password Infinity',
      artist: 'zezo.dev',
     },
     {
      id: '2',
      url: 'https://www.w3schools.com/tags/horse.mp3',
      title: 'horse',
      artist: 'zezo.dev',
     }
  ]);
  await TrackPlayer.setRepeatMode(RepeatMode.Queue);
}
Bước 6: Chạy thử nghiệm ứng dụng

Bài viết tiếp theo sẽ thêm các nút điều khiển Next Previous